Planting
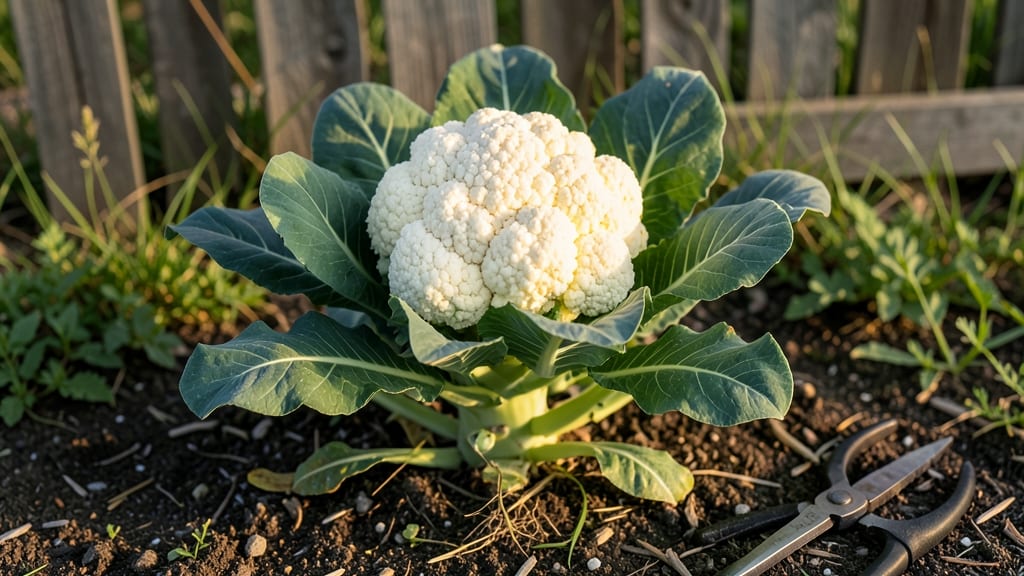
Understanding the parts of a cauliflower plant turns confusion into confidence—especially when you realize every piece, from the curd to the roots, plays a role in your harvest. 🌱 I spent years growing cauliflower, always assuming only the head mattered, until I discovered how the leaves, stems, and even roots contribute to the plant's success (and your dinner plate).
The curd is the star—those tightly packed florets we all recognize—but the leaves act like solar panels, soaking up sunlight to fuel growth. Meanwhile, the stem acts as a support system, lifting the head toward the sky while storing nutrients.
Even the roots matter, spreading wide to anchor the plant and pull up moisture from deep in the soil.
You’ll soon see how each part works together: strong roots mean sturdy stems, which hold up the curd while the leaves keep it growing. The result? A plump, flavorful head that’s easier to grow than you’d think.
Plus, you’ll learn which parts you can eat and how to keep the whole plant thriving from seed to harvest.
Whether you’re growing in a backyard or container, this breakdown makes it simple to spot issues early—like yellowing leaves or stunted growth—and fix them before they derail your crop. No more guessing what’s wrong when your cauliflower isn’t performing.
📚 In This Guide
- What you need
- Instructions
- Tips and common mistakes
- Wrapping up and next steps
What you need
- ● Cauliflower seeds or seedlings: Quantity: 10–20 seeds (or 3–5 seedlings for a small garden)
- ● Variety: Choose disease-resistant types like Snowball Y Improved or Purple of Sicily for unique colors.
- ● Potting soil or garden bed: Type: Well-draining, rich in organic matter (compost or aged manure).
- ● pH Level: 6.0–7.0 (test with a soil kit if needed).
- ● Containers or garden space: Containers: 12–18" deep pots (1 plant per container).
- ● Garden beds: Full sun (6+ hours/day) and space 18–24" apart.
- ● Basic gardening tools: Trowel or hand shovel
- ● Watering can or hose with a gentle spray nozzle
- ○ Gloves (optional but recommended for handling soil).
- ● Fertilizer: Balanced organic fertilizer (e.g., 10-10-10) or compost tea for nutrient boosts.
- ● Mulch: Straw or shredded leaves to retain moisture and suppress weeds.
- ● Shade cloth: 30–50% coverage for hot climates to prevent bolting.
- ● Plant ties or stakes: For tall varieties to support heavy heads.
- ● pH test kit: To monitor soil acidity (critical for cauliflower health!).
Understanding the edible anatomy of a cauliflower plant
Let’s break down what’s truly usable—and surprising—in your garden’s cauliflower harvest.
🌱 Step 1: Identify the Curd (The Star of the Show)
The cauliflower head, or curd, is the dense, white (or purple, orange) cluster you’re used to eating. It forms when the plant’s terminal bud tightens into a compact mass of undeveloped flower buds. This is the part you’ll harvest when it reaches 6-8 inches in diameter and feels firm to the touch.
Here’s the thing—this curd isn’t just the head. Each tiny floret within it is a potential bloom, packed with nutrients. When you cut the curd, leave 1-2 inches of stem attached to prevent the plant from sending energy elsewhere. If the curd starts to loosen or turn yellow, it’s overmature and tougher to eat.
🌿 Step 2: Don’t Overlook the Leaves (The Green Powerhouses)
Cauliflower leaves are edible, nutrient-rich, and often discarded. The outer leaves are larger and slightly bitter, while the inner leaves (closer to the curd) are tender and milder. Blanch them for 2-3 minutes to soften texture before using in soups or sautés.
Real talk: These leaves are packed with vitamin K, fiber, and antioxidants. Harvest them 2-3 weeks before curd maturity for the best flavor. If the leaves yellow or wilt, it’s a sign of nutrient deficiency—feed the plant with a balanced fertilizer to revive them.
🌱 Step 3: Explore the Stems (The Crunchy Surprise)
The stems of a cauliflower plant are crisp, mild, and often overlooked. The central stem (the thick one connecting the curd to the base) is the most substantial, while the side stems (branching off the main stalk) are thinner but still edible. Peel them if the skin is tough, then slice into ¼-inch strips for stir-fries or roasting.
Don’t skip this part: The stems are rich in vitamin C and folate. If your plant bolts (sends up a flower stalk), the stems become woody—harvest them before flowering for the best texture. Younger stems are sweeter and more tender.
🪴 Step 4: Roots (The Hidden Treasure)
Yes, even the roots of a cauliflower plant are edible—though they’re rarely used. The taproot (main root) is fibrous and slightly earthy, best peeled and sliced thin for stir-fries. The lateral roots (smaller roots branching off) are milder and can be chopped into salads or blended into soups.
Here’s where it gets interesting: These roots are high in fiber and minerals, but they’re labor-intensive to clean. Only harvest them from young plants (under 3 months old) before the roots become woody. If you’re growing cauliflower in containers, the roots will be more concentrated and easier to access.
✂️ Step 5: Post-Harvest Uses for Every Part
Now that you know what’s edible, here’s how to use it all. Curd: Roast whole or cut into florets. Leaves: Blanch and add to grain bowls. Stems: Julienne and sauté with garlic. Roots: Peel and shred into kimchi or fermented side dishes.
This is the moment that matters: By using every part, you reduce waste and maximize flavor. Store leaves and stems in the fridge for up to 5 days, while roots can be kept for 3-4 days if wrapped in a damp towel. Freeze curds for up to 6 months by blanching first.
Tips & tricks for perfectly utilizing every part of your cauliflower plant
Between us, you're missing out if you're only eating the curd. Here's how to transform every part of your cauliflower harvest into culinary gold.
Curd Harvesting Precision: When harvesting that 6-8 inch curd, use a sharp knife to cut cleanly through the stem—don't rip it. The clean cut prevents bruising and maintains the plant's energy flow to any remaining side shoots. I've found that harvesting on a cool morning preserves the curd's crisp texture better than midday heat. The 1-2 inches of stem you leave attached acts as a natural handle, making transport easier without damaging the plant.
Leaf Preparation Technique: Those 2-3 minutes of blanching for the leaves are your secret weapon. Use ice water to shock them immediately after blanching—this stops the cooking process instantly and preserves their vibrant green color. For the tougher outer leaves, I like to chop them finely and use them as a flavor base in soups, while the tender inner leaves can be used whole in salads or lightly sautéed. The bitterness in outer leaves actually mellows when cooked with acidic ingredients like lemon or vinegar.
Stem Texture Transformation: The key to tender stems lies in proper prep. Always peel the thicker central stems—just like you would a potato—while thinner side stems can be used with skin on if young. For stir-fries, I recommend cutting them into those ¼-inch strips and parboiling for 1 minute first. This jumpstart on cooking prevents them from turning mushy when they hit the hot wok. The younger the stem, the sweeter it tastes—harvesting before flowering makes all the difference.
Root Cleaning Strategy: Cleaning those fibrous taproots can feel like a chore, but here's my trick: Soak them in cold water for 10 minutes first to loosen dirt, then use a vegetable brush to scrub. For the lateral roots, simply rinse and chop—no need for scrubbing. The earthy flavor of roots pairs beautifully with umami-rich ingredients like soy sauce or mushrooms. I've even used them in place of ginger in stir-fries for a different but delicious texture.
Pro Tips for Parts Of Cauliflower Plant
- Between us, you're missing out if you're only eating the curd. Here's how to transform every part of your cauliflower...
- Curd Harvesting Precision: When harvesting that 6-8 inch curd, use a sharp knife to cut cleanly through the stem—don'...
- Leaf Preparation Technique: Those 2-3 minutes of blanching for the leaves are your secret weapon. Use ice water to sh...
Frequently asked questions
Got questions about the parts of a cauliflower plant?
You’re not alone! Here are some of the most common queries—plus easy answers to help you make the most of every edible (and non-edible) piece.
Can you eat cauliflower leaves and stems?
Yes! While the curd (the white head) is the star, the leaves and stems are edible too. Young leaves can be sautéed like greens, and stems are great in stir-fries or roasted. Just avoid tough, fibrous older leaves—they’re better for compost!
How long does it take for a cauliflower plant to produce a head?
Most cauliflower varieties take 70–100 days to mature, depending on the type. Smaller heads (like ‘Snowball’) may form faster (60–80 days), while larger varieties (like ‘Romanesco’) can take up to 120 days. Check seed packets for exact timelines!
What do I do with cauliflower roots after harvest?
Cauliflower roots are not edible but can be repurposed! Chop them into compost or mulch for your garden. If you’re feeling creative, blend them into homemade plant food—just let them decompose first.
Can I regrow cauliflower from the base after cutting the head?
Unfortunately, no. Once you harvest the curd, the plant’s energy is spent, and regrowth is unlikely. However, you can harvest the leaves and stems for a few more weeks before pulling the plant. Save seeds for next season instead!
Why is my cauliflower head turning yellow or brown?
Yellowing or browning can happen due to heat stress, uneven watering, or pests. If it’s too hot (above 85°F), the curd may bolt (flower). Keep plants well-watered, shaded in peak sun, and pest-free for a perfect head.
Wrapping up and next steps
Understanding the parts of a cauliflower plant—from its edible curd and nutritious leaves to its sturdy stems and hidden roots—unlocks a world of culinary and gardening possibilities! Whether you're growing your own or exploring new recipes, each part offers unique benefits.
Now that you're armed with this knowledge, why not plant your own cauliflower or experiment with creative dishes using every edible piece? 🌱
Start small—try growing a few plants or swap out store-bought curds for homegrown leaves in soups or salads. The garden (or kitchen!) awaits your next adventure. Happy growing and cooking! 😊