Blooming
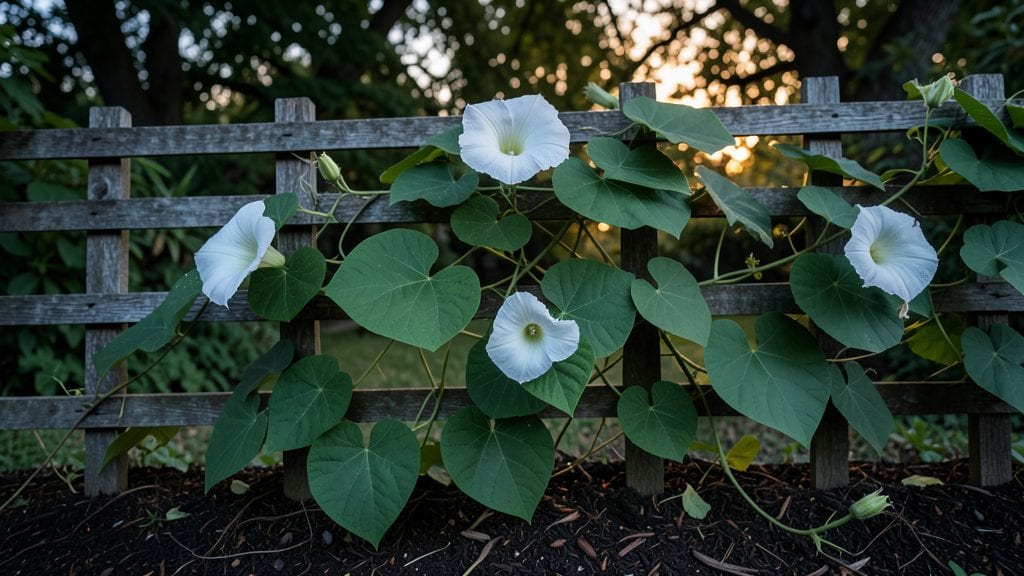
The moonflower blooming season in the Pacific Northwest is unlike anything else—imagine a garden that comes alive after dark, when most flowers have called it a night. 🌙 These frost-resistant varieties don’t just survive our damp summers; they thrive, unfurling their silvery-white blossoms only when the moon is high and the air cools.
What makes them special isn’t just their nocturnal magic, but how well they adapt to our climate. Plant them in late spring after the last frost, and by summer evenings, you’ll be rewarded with blooms that last until dawn.
The key? A spot with partial shade during the day and protection from wind—no fancy tricks, just smart placement.
Your garden will transform into a moonlit spectacle, with delicate petals that open only under moonlight’s glow. The scent is intoxicating—like a whisper of jasmine carried on a summer breeze. These flowers aren’t just pretty; they’re a conversation starter, a midnight garden party for pollinators like moths and bats.
Perfect for cottage gardens, woodland edges, or even container plantings on patios. With the right care, you’ll have blooms that outlast most summer flowers and bring a touch of enchantment to your evenings. Let’s make your garden shine after dark.
📚 In This Guide
- What you need
- Instructions
- Tips and common mistakes
- Wrapping up and next steps
What you need
- ● Moonflower seeds (Ipomoea alba) – Choose frost-resistant varieties like 'Moonlight' or 'Evening Sky' (20-50 seeds, depending on desired coverage).
- ● Well-draining potting mix – A blend of peat moss, perlite, and compost (50% peat, 30% perlite, 20% compost; ~5 gallons per pot).
- ● Containers or garden beds – For containers: 5-gallon pots or larger (with drainage holes) or fabric grow bags (12"+ depth).
- ● For in-ground: Loose, fertile soil with a pH of 6.0-7.0 (amend with compost if needed).
- ● Slow-release fertilizer – Balanced 10-10-10 or organic options like fish emulsion (1 tbsp per gallon of soil).
- ● Watering can or hose with gentle spray nozzle – Avoid over-saturating roots.
- ● Trellis or sturdy support structure – 6-8 ft tall bamboo stakes, wire mesh, or A-frame trellis (1 per plant or shared for clusters).
- ● Row cover or frost cloth – Lightweight frost protection fabric (for early/late seasons).
- ● Garden gloves – Protect your hands from thorns (some varieties have mild prickles).
- ● Pruning shears – For trimming dead vines or shaping growth.
- ● Mulch (straw or shredded bark) – 2-3 inches to insulate roots in winter.
- ○ Grow lights (optional) – LED full-spectrum bulbs for indoor starts (if sowing early).
- ● Soil moisture meter – Ensures optimal hydration without guesswork.
- ● Decorative accents – Solar-powered string lights or wind chimes to enhance your moonlit garden vibe! 🌙💡
Step-by-step guide to encouraging moon flower blooms in the Pacific Northwest
Here's how to coax vibrant blooms from your frost-hardy moon flowers—no matter how chilly your PNW summers get.
🌱 Step 1: Plant in Well-Draining Soil with Winter Protection
Moon flowers thrive when planted in loamy, well-draining soil enriched with 2-3 inches of compost before transplanting. The Pacific Northwest's cool, damp climate means you'll need to amend heavy soils with sand or perlite to prevent root rot. I always dig in a handful of bone meal at planting time—this gives the vines the phosphorus boost they need for strong root systems before flowering.
Here's the thing—moon flowers are frost-tolerant, but young plants need extra protection. After planting, mound 4-6 inches of mulch around the base (but not touching the stems) to insulate roots during late spring frosts. Use straw or shredded bark—it breaks down slowly and keeps soil temperatures stable. Water deeply after planting, then let the top 2 inches of soil dry before watering again to establish roots without encouraging fungal diseases.
☀️ Step 2: Train Vines for Maximum Sun Exposure
Moon flowers need full sun (6+ hours daily) to produce their signature night-blooming flowers, but PNW summers often bring overcast skies. I solve this by installing 4-6 foot tall trellises at planting time—this gives vines vertical space to climb toward any available light. Use galvanized wire or sturdy wooden stakes that won't rust in our damp climate.
Here's what I've learned: If you let vines sprawl on the ground, they'll produce fewer blooms. Instead, gently weave new growth through the trellis as it emerges. When vines reach the top, pinch back the tips to encourage bushier growth lower down—this creates more nodes where flowers will form. Watch for new leaves appearing every 6-8 inches along the stem; these are your flowering zones.
💧 Step 3: Water Strategically During Bloom Season
Consistent moisture is key for moon flowers, but too much water stresses them. I water deeply once a week during dry spells, aiming for 1-1.5 gallons per plant at the soil base—not overhead. The large, heart-shaped leaves are prone to fungal issues if they stay wet, so always water in the early morning so foliage dries before evening.
Real talk: Moon flowers are drought-tolerant once established, but they'll reward you with more blooms if you maintain even moisture. You'll know you're doing it right when the vines show dark green, glossy leaves without yellowing. If leaves start curling or wilting, it's a sign of either underwatering or overwatering—check the soil 2 inches down to decide which it is.
✂️ Step 4: Deadhead and Prune for Extended Blooming
Deadheading spent blooms is the secret to keeping moon flowers flowering all summer. I remove faded flowers by pinching off the stem just above the next set of leaves. This redirects the plant's energy into producing new buds instead of seed pods. Do this every 3-4 days during peak bloom—it's a small effort that pays off with weeks of continuous flowers.
For established plants, I do a light pruning in early summer to remove any leggy growth or crowded stems. Cut back to a healthy leaf node just above where you see new growth emerging. This keeps air circulating and prevents diseases like powdery mildew that thrive in our damp climate. The pruned stems can be composted—just avoid putting them near your moon flowers to prevent spreading any potential pathogens.
⏰ Step 5: Prepare for Winter Dormancy
Moon flowers are frost-resistant, but they do go dormant in winter. When temperatures consistently drop below 40°F at night, stop fertilizing and reduce watering to once every 2-3 weeks. The vines will die back naturally, but the roots remain alive underground. I mound 6-8 inches of straw mulch over the base to protect them through winter.
Here's where it gets fun—they'll burst back to life in spring with minimal care. In early March, remove the old mulch and add 1-2 inches of fresh compost around the base. Water lightly to wake up the roots, then watch for new shoots emerging within 2-3 weeks. That's your signal to start training them up the trellis again for another season of stunning night-blooming flowers.
Tips & tricks for perfect moon flower blooming
These little-known tricks will help your moon flowers thrive in the Pacific Northwest's tricky climate.
Soil Test First: Before planting, test your soil's drainage by digging a hole, filling it with water, and timing how long it takes to drain. Moon flowers need soil that drains within 2-3 hours—if yours takes longer, mix in 1 part sand or perlite to 3 parts soil before adding the 2-3 inches of compost specified. I've seen heavy clay soils cause root rot even with mulch, so this step is non-negotiable.
Trellis Timing: Install your 4-6 foot trellis at planting time, not later. Vines grow surprisingly fast in PNW summers, and waiting means you'll have to constantly adjust or risk tangled, unproductive growth. I like to pre-assemble trellises from galvanized wire—they're sturdy, rust-resistant, and easy to adjust as vines grow. The key is getting them in place before the first 6-inch vine appears.
Watering Hack: Use a soaker hose or drip irrigation for the 1-1.5 gallons per week watering requirement. This delivers water directly to the roots without wetting the leaves, which prevents fungal diseases that thrive in our damp climate. I set my timer for 10-15 minutes per plant in the early morning—just enough to saturate the soil 2 inches down without creating surface puddles.
Winter Prep Secret: When you mound that 6-8 inches of straw mulch in fall, don't forget to leave a small gap around the base of the stem. This prevents rot while still protecting roots from freezing. I also mark the mulch location with a small stake—come spring, you'll be grateful not to accidentally dig into your winter protection when removing old mulch in early March.
Pro Tips for Moon Flower Blooming
- These little-known tricks will help your moon flowers thrive in the Pacific Northwest's tricky climate.
- Soil Test First: Before planting, test your soil's drainage by digging a hole, filling it with water, and timing how long it takes to drain.
- Trellis Timing: Install your 4-6 foot trellis at planting time, not later.
Frequently asked questions
Got questions about coaxing those ethereal moon flower blooms to life in your Pacific Northwest garden? You’re not alone! Here are answers to the most common queries—from timing to troubleshooting—so you can grow these nocturnal beauties with confidence.
When is the best time to plant moon flower seeds for blooms?
For Ipomoea alba (moonflower), plant seeds 4–6 weeks after your last frost date (typically late April–May in the PNW). They thrive in warm soil (70°F+) and need 60–90 days of heat to bloom. Start indoors in March if your zone has cool springs, or direct-sow after Memorial Day for outdoor planting. Pro tip: Use black plastic mulch to warm the soil faster!
Are moonflowers truly frost-resistant, or do I need to protect them?
While mature moonflowers tolerate light frosts (28–32°F), young seedlings and blooms won’t survive hard freezes (<25°F). In the PNW’s zones 7–9, cover plants with frost cloth if temps dip below 30°F. Cut back vines after frost—the roots often resprout! For extra insurance, choose Ipomoea alba ‘Moonlight’, a hardier hybrid.
Why aren’t my moonflowers blooming—what am I missing?
Moonflowers need full sun (6+ hours/day) and consistent moisture to trigger blooms. Common culprits:
- Too much shade: Move to sunnier spot (even dappled light can delay flowers).
- Over-fertilizing: Too much nitrogen = leafy vines, no blooms. Use low-phosphorus fertilizer (like 5-10-10) sparingly.
- Drought stress: Water deeply 1–2x/week (more in summer). Mulch to retain moisture.
- Improper pruning: Deadhead spent blooms to encourage more flowers, but avoid cutting back vines until fall.
Can I grow moonflowers in containers, or do they need a garden bed?
Moonflowers thrive in large containers (12"+ diameter) with well-draining soil. Use a mix of potting soil + perlite, and place pots in full sun. Choose compact varieties like ‘Prosperity’ for smaller spaces. Rotate containers weekly for even sun exposure, and water consistently—containers dry out faster.
How do I extend the blooming season for moonflowers?
Moonflowers bloom overnight (opening at dusk, closing by noon), but you can prolong their season with these tricks:
- Succession plant: Sow new seeds every 2–3 weeks from May–July for continuous blooms.
- Deadhead regularly: Remove faded flowers to redirect energy to new buds.
- Provide afternoon shade in hot summers (like near a lattice) to prevent wilting.
- Frost-proof young plants: Use row covers in fall to protect late-season blooms.
Wrapping up and next steps
Witnessing your moon flower blooming in the Pacific Northwest’s chilly climate is a magical reward for patience and care! 🌙 These frost-resistant varieties prove that beauty thrives even in cooler seasons—just give them the right soil, sunlight, and a little love.
Now that you’re armed with the how-to, why not plant one this weekend? Start small, experiment with colors, and soon, your garden will glow under the moonlight like a dream. Happy gardening!