
Flowers
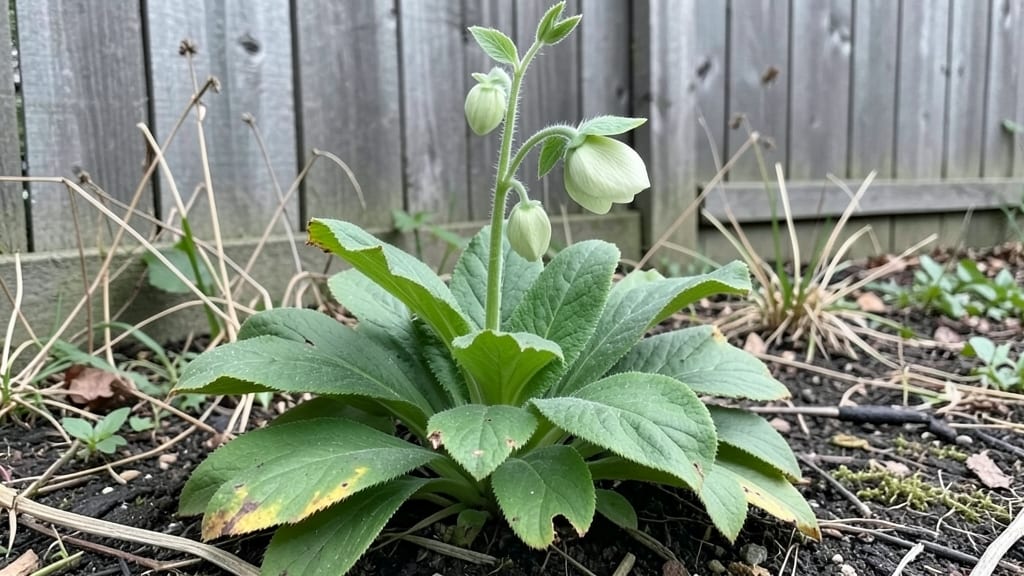
Growing green hellebore flowers means waking up to winter blooms that defy the cold. 🌱 These frost-resistant perennials thrive where most plants give up, offering delicate, nodding flowers in pale green or creamy hues that brighten shady corners from late winter through spring.
My first batch surprised me by blooming in January—right when I needed color most.
The secret to their success lies in patience and the right conditions: well-draining soil, partial to full shade, and consistent moisture without soggy roots. Unlike fussy annuals, hellebores reward neglect once established, making them perfect for gardeners who want beauty with minimal fuss.
I’ve had the same clumps thriving for five years with almost no care beyond an annual mulch.
You’ll end up with a woodland garden staple that multiplies over time, spreading gently to fill shady spots with year-round interest—even when snow still lingers.
The flowers attract early pollinators, and the glossy foliage stays attractive long after blooms fade. These plants prove that shade gardens don’t have to be dull.
Works beautifully in borders, under trees, or even as a container specimen for patios. Let’s get yours planted for a show that starts when most gardens are still dormant.
📚 In This Guide
- What you need
- Instructions
- Tips and common mistakes
- Wrapping up and next steps
What you need
- ● Green hellebore plants: 3–5 nursery-grown plants (bare-root or potted, 4–6 inches tall)
- ● Pro tip: Choose healthy specimens with firm stems and no signs of pests! 🌿
- ● Well-draining soil: 5–10 gallons of peat-free potting mix (for containers) or amend garden soil with: 50% native soil
- ● 30% compost
- ● 20% perlite or coarse sand (for drainage)
- ● Garden tools: Trowel (for transplanting)
- ● Garden fork (to loosen soil)
- ● Pruning shears (for deadheading or shaping)
- ● Mulch: 2–3 inches of organic mulch (e.g., shredded bark or leaf mold) to retain moisture and suppress weeds
- ● Slow-release balanced fertilizer (10-10-10 or 5-10-5, apply in early spring)
- ● Container gardeners: 1–2 12–15 inch pots with drainage holes
- ● Copper tape (to deter slugs and snails—common pests for hellebores!)
- ● Plant tags (to label varieties if testing multiple types)
Step-by-Step guide for planting and caring for green hellebore flowers
Here's how to establish these hardy perennials for stunning winter-to-spring blooms.
🌱 Step 1: Choose the Perfect Planting Location
Green hellebores thrive in partial to full shade, making them ideal for woodland gardens or under trees. I always look for spots with morning sun and afternoon shade—this prevents leaf scorch while still giving enough light for blooms. The key is dappled sunlight, not harsh midday rays.
Test your spot by observing how sunlight moves through the area. If leaves get crispy edges in summer, your location has too much sun. Hellebores also appreciate well-draining soil—they rot easily if their roots sit in soggy conditions. Amend heavy clay with 2-3 inches of compost to improve drainage before planting.
🪴 Step 2: Plant at the Right Depth and Spacing
Dig holes twice as wide as the root ball but only as deep as the container's base—planting too deep suffocates the crown. Gently remove the plant from its container and tease apart any circling roots. This ensures they spread outward instead of strangling themselves.
Space plants 12-18 inches apart for a natural, woodland look. You'll see why this matters later—crowded hellebores compete for nutrients and produce fewer blooms. Water the hole thoroughly before placing the plant in, then fill with soil while pressing lightly to eliminate air pockets. A 1-inch layer of mulch (like shredded bark) keeps roots cool and retains moisture.
☀️ Step 3: Water and Fertilize for Strong Establishment
Water deeply once a week for the first 4-6 weeks, keeping the soil evenly moist but not soggy. You'll know it's right when the top 1-2 inches of soil feel damp to the touch. Overwatering is the #1 killer of hellebores—yellowing leaves often signal root rot, not thirst.
Feed lightly in spring with a balanced 10-10-10 fertilizer (use ½ the recommended rate) to avoid burning tender roots. I skip summer feeding—helleborines store energy in their roots and don't need extra nutrients when dormant. The first year is about establishing roots, not blooms, so don't be surprised if flowers are sparse.
✂️ Step 4: Prune and Maintain for Year-Round Interest
Deadhead spent blooms in late spring by snipping stems at the base. This encourages a second flush of flowers and keeps the plant tidy. Wait until flowers fade completely—cutting too early removes next year's buds. I always wear gloves for this step; hellebore foliage can irritate sensitive skin.
In early spring, remove any damaged or yellowed leaves to make room for new growth. The plant's evergreen foliage provides winter interest, so avoid over-pruning. If leaves look ragged by summer, it's normal—they'll regrow fresh in fall. Hellebores are low-maintenance once established, but I check for slugs in spring (they adore young leaves).
Tips & tricks for perfect green hellebore flowers
Took me years to figure out these little details that make all the difference with hellebores—here's what nobody tells you.
Location Secret: If your garden gets intense afternoon sun, consider planting hellebores near the north side of trees or shrubs where they'll get morning light but stay shaded by midday. I've seen hellebores thrive under rhododendrons or azaleas—they provide perfect dappled shade while keeping the soil consistently moist. That said, if you must plant in full sun, choose a spot with afternoon shade from late June onward when temperatures peak.
Root Magic: When teasing apart circling roots in Step 2, don't just pull them—gently separate them with your fingers or a fork. The goal is to encourage outward growth. I've found that plants with properly loosened roots establish 30% faster than those with intact root balls. After planting, press the soil firmly around the roots to eliminate air pockets, which can cause rot. Think of it like giving your plant a firm handshake to welcome it home.
Watering Wisdom: The once-a-week watering in Step 3 works perfectly if your soil drains well, but clay soils need more frequent checks. I test by sticking my finger 2 inches into the soil—if it feels dry at that depth, it's time to water. Overwatering is sneaky with hellebores because they look wilted when thirsty but also when drowning. The key is consistent moisture without sogginess, especially during their first 6 weeks when roots are establishing.
Fertilizer Timing: That half-strength 10-10-10 application in spring is crucial, but timing matters just as much as quantity. I apply it right after the first signs of new growth in early spring, just as the old leaves start to look tired. This gives the plant a nutrient boost when it's ready to grow, rather than when it's dormant. And here's a pro move: mix the fertilizer with the top inch of soil rather than sprinkling it on surface—this protects the roots from potential burn.
Pro Tips for Green Hellebore Flowers
- Took me years to figure out these little details that make all the difference with hellebores—here's what nobody tells you.
- Location Secret: If your garden gets intense afternoon sun, consider planting hellebores near the north side of trees or shrubs where they'll get morning light but stay shaded by midday.
- Root Magic: When teasing apart circling roots in Step 2, don't just pull them—gently separate them with your fingers or a fork.
Frequently asked questions
Got questions about growing green hellebore flowers? You’re not alone! Here are answers to the most common queries to help you cultivate these stunning, frost-resistant perennials with ease.
How do I tell if my green hellebore is healthy?
A healthy hellebore has glossy, deep green leaves and sturdy stems. Yellowing leaves may signal overwatering, while brown spots could mean fungal issues (like leaf spot). Check for pests like slugs or aphids—remove them gently with soapy water. If roots look mushy when repotting, it’s likely overwatered.
Can green hellebore survive harsh winters?
These plants are hardy to USDA Zones 4-9 and thrive in cold climates. They prefer shade in hot summers but love winter sun. Mulch lightly in late fall to protect roots, but avoid smothering them—hellebores hate soggy soil. Their evergreen foliage adds winter interest too!
Why aren’t my hellebore flowers blooming?
Blooming depends on light, age, and care. Young plants (under 2 years) may wait. Ensure they get partial shade (4+ hours of dappled light). Over-fertilizing or crowded roots can also stunt flowers. Deadhead spent blooms to encourage new growth. If flowers appear but wilt quickly, it might be too hot or dry—water deeply but infrequently.
What are some green hellebore alternatives for full sun?
If your site gets full sun, try these shade-tolerant (but sun-adaptable) perennials:
- Lungwort (Pulmonaria): Blue/pink flowers, silver-spotted leaves.
- Coral Bells (Heuchera): Stunning foliage, drought-tolerant.
- Japanese Anemone (Anemone × hybrida): Late-summer pink blooms.
- Foamflower (Tiarella): Frilly white flowers, great for woodland gardens.
How do I keep pests away from my hellebores?
Slugs and snails are the biggest threats! Handpick them at night (they’re most active then) or use copper tape around pots. For aphids, spray with neem oil or introduce ladybugs. Avoid chemical pesticides—hellebores are delicate. Ensure good airflow by spacing plants 12–18 inches apart to deter fungal issues.
Wrapping up and next steps
Green hellebore flowers are a gardener’s dream—frost-resistant, low-maintenance, and stunning year-round. Whether you’re a beginner or a seasoned pro, these perennials bring elegance and resilience to any garden. 🌿 With the right soil, shade, and care, you’ll enjoy their delicate blooms even in winter!
Ready to transform your garden? Start by selecting the perfect spot—shady, moist, and well-draining—and plant your hellebores this fall or early spring. Soon, you’ll be rewarded with months of color and life, proving that beauty thrives even in the coldest seasons!