Watering
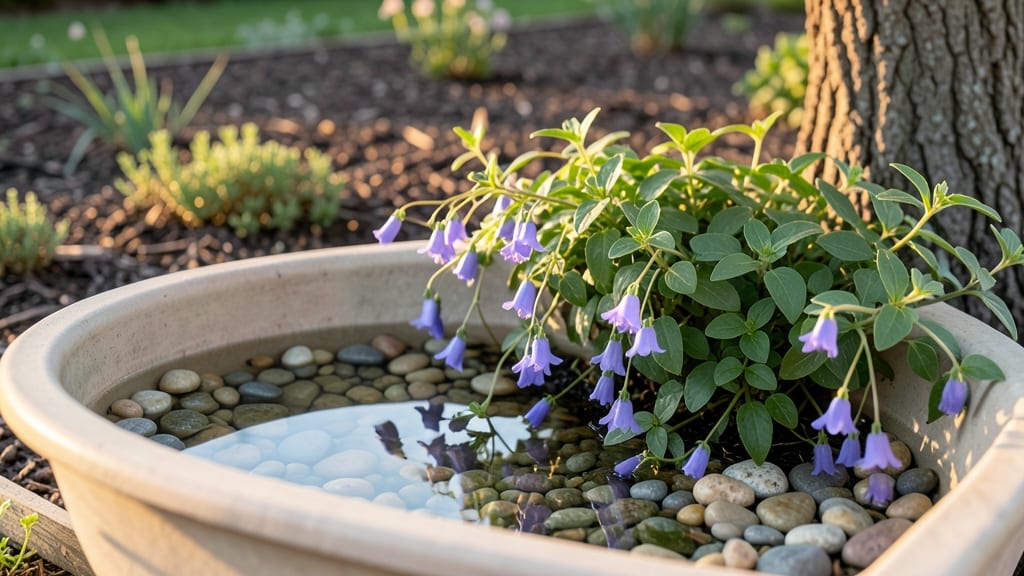
Transform this rustic water trough flower bed into a buzzing pollinator magnet with minimal effort—just three repurposed troughs turned into thriving mini-ecosystems that draw bees, butterflies, and hummingbirds.
The key? Choosing the right plants and drainage setup to keep water where it belongs: in the soil, not pooling at the bottom.
You’ll need a sturdy trough (plastic, metal, or wood), drainage holes if it’s not already drilled, potting mix designed for containers, and a handful of drought-tolerant perennials like lavender, sedum, or coneflowers.
The setup takes under an hour, and once planted, these troughs require half the watering of traditional beds. Plus, they’re perfect for small spaces, patios, or even hanging from walls.
Imagine a vertical garden teeming with life—bees sipping from purple blooms while your neighbors stare in envy. The best part? These troughs stay lush all summer with just weekly watering, and the pollinators will thank you by turning your yard into a buzzing hotspot.
Ready to skip the weeding and create a low-maintenance masterpiece?
Works for any yard style, from cottage gardens to modern minimalism. Whether you’re using a single trough or a cascading trio, the possibilities are endless—and the pollinators will lead the way.
📚 In This Guide
- What you need
- Instructions
- Tips and common mistakes
- Wrapping up and next steps
What you need
- ● Water trough: 1 galvanized steel, plastic, or wooden trough (12–24 inches wide, 2–3 feet long, and 6–12 inches deep)
- ○ Optional: Pre-drilled drainage holes (if not already present)
- ● Drainage: 1–2 plastic bottles (for DIY drainage) or 1–2 small gravel rocks (for weight and drainage)
- ● Drill or screwdriver (if modifying the trough)
- ● Soil & amendments: 1–2 bags of well-draining potting mix (avoid garden soil—it compacts!)
- ● 1 bag of perlite or coarse sand (for aeration, 10–20% of soil mix)
- ○ Optional: Slow-release fertilizer (like osmocote) or compost
- ● Plants: 3–5 pollinator-friendly plants (e.g., sedum, lavender, salvia, or black-eyed Susans)
- ● Pro tip: Choose drought-tolerant varieties for low-maintenance care! 🌡️
- ● Extras: 1 small shovel or trowel
- ● 1 level (to ensure the trough sits evenly)
- ● 1 waterproof liner (if using a non-galvanized trough)
- ○ Optional: Decorative stones, mulch, or a small solar-powered fountain for ambiance ✨
- ● Sunny spot (6+ hours of sunlight daily)
- ● Access to water (for filling the trough)
- ● Basic gardening knowledge (or willingness to learn!)
How to create a thriving water trough flower bed
Transforming old troughs into lush pollinator havens is simpler than you think—here’s my battle-tested approach.
Select and Prepare the Troughs
Choose galvanized steel or plastic troughs that are at least 12 inches wide and 18 inches long—this gives roots room to establish while keeping water retention manageable. Inspect for cracks or sharp edges that could harm plants or pollinators. If using metal, ensure it’s food-safe (like those repurposed from livestock waterers) to avoid chemical leaching into the soil.
Clean thoroughly with a 10% bleach solution (1 part bleach to 9 parts water) to kill any lingering bacteria or mold. Rinse well and let dry completely in the sun—UV exposure helps break down any remaining residue. Place a 2-inch layer of landscape fabric at the bottom to prevent soil from washing out drainage holes while allowing excess water to escape.
Layer Soil and Drainage Strategically
Fill the trough one-third full with a mix of 50% coarse sand and 50% perlite—this creates ideal drainage while preventing compacted soil that suffocates roots. The sand-perlite combo also helps regulate moisture, which is critical in troughs where water can pool unevenly. Tap the container gently on a solid surface to settle the layer evenly.
Next, add 3 inches of high-quality potting mix designed for containers. Avoid garden soil—it compacts and drains poorly in confined spaces. Mix in 1 tablespoon of slow-release organic fertilizer per trough to give plants a nutrient boost without risking salt buildup. Moisten the soil lightly with water until it’s damp but not soggy—you want it to hold moisture for plants but not create a swampy environment.
Choose Pollinator-Friendly Plants
Select native perennials and annuals that thrive in shallow roots and attract bees, butterflies, and hummingbirds. Good choices include coneflowers, black-eyed Susans, lavender, and milkweed—all of which tolerate drought once established. Space plants 4-6 inches apart to allow airflow and prevent fungal diseases that thrive in enclosed trough spaces.
Plant in late spring after the last frost when soil temperatures are consistently above 55°F. Dig holes twice as wide as the root ball but only as deep as the container’s original soil level. Gently remove plants from their nursery pots, tease apart any circling roots, and place them in the holes. Backfill with soil, pressing lightly to eliminate air pockets around the roots.
Water and Position for Success
Water deeply immediately after planting to settle the soil and eliminate air gaps. Use a gentle spray nozzle to avoid dislodging plants. In the first 2 weeks, keep the soil consistently moist by watering every 2-3 days—troughs dry out faster than ground beds. After establishment, reduce watering to once weekly, allowing the top inch of soil to dry between sessions to encourage deep root growth.
Position troughs in full sun (6+ hours daily) where they’ll receive gentle morning sunlight and afternoon shade if temperatures exceed 85°F. This prevents overheating, which can scorch plants and deter pollinators. Place them on elevated stands or bricks to improve drainage and prevent waterlogging during heavy rains.
Maintain with Minimal Effort
Add 1-2 inches of mulch (like shredded bark) around plants to retain moisture and suppress weeds. Avoid thick layers—troughs can overheat, and mulch too close to stems invites rot. Check for pests weekly, particularly aphids or spider mites, which thrive in enclosed spaces. Spray infestations with neem oil or a soapy water solution (1 tablespoon mild dish soap per gallon of water) for an organic fix.
Fertilize once in early summer with a balanced organic fertilizer (10-10-10 ratio) to support blooming. Deadhead spent flowers monthly to encourage continuous blooms and attract more pollinators. By mid-summer, your trough should be a buzzing hub—proof that even small spaces can make a big impact for wildlife.
Tips & tricks for perfect water trough flower beds
Here's what I've learned from turning neglected troughs into thriving pollinator magnets—details that make all the difference.
Trough Selection Matters: In Step 1, prioritize troughs with drainage holes along the bottom edges, not just the center. The 12-inch width and 18-inch length dimensions are ideal because they provide enough space for root systems while maintaining manageable water retention. If you're working with metal troughs, test for food safety by checking for any rust or chemical residue—pollinators are sensitive to contaminants. A quick vinegar rinse before bleaching can help remove stubborn mineral deposits that bleach alone might miss.
Soil Layering Technique: When creating the drainage layer in Step 2, don't skip the gentle tapping step after adding the sand-perlite mix. This simple action prevents voids that can create dry pockets where roots won't establish. I've seen troughs fail when homeowners rush this step, thinking it's unnecessary—those voids become water traps that rot roots. Also, consider adding a thin layer of horticultural charcoal between the drainage layer and potting mix to prevent fungal growth, especially in humid climates.
Plant Spacing Secret: The 4-6 inch spacing in Step 3 might seem generous, but it's crucial for airflow in enclosed spaces. In my experience, plants crowded closer than 4 inches develop fungal diseases within weeks. For taller plants like milkweed, space them at the wider end of this range—6 inches—to give their roots room to spread. I've found that staggering plant placement (like a brick pattern) creates a more natural look while maximizing space efficiency.
Heat Management Strategy: The 55°F soil temperature threshold in Step 3 is your planting cue, but the 85°F afternoon shade recommendation in Step 4 is equally important. I've learned this the hard way—direct afternoon sun at temperatures above 85°F can cook plants in their containers. Position your troughs where they receive morning sun and afternoon shade from nearby structures or trees. If you don't have natural shade options, consider using shade cloth (30-50% coverage) during peak heat hours, especially in the first few weeks after planting.
Pro Tips for Water Trough Flower Bed
- Here's what I've learned from turning neglected troughs into thriving pollinator magnets—details that make all the di...
- Trough Selection Matters: In Step 1, prioritize troughs with drainage holes along the bottom edges, not just the cent...
- Soil Layering Technique: When creating the drainage layer in Step 2, don't skip the gentle tapping step after adding ...
Frequently asked questions
Got questions about creating a water trough flower bed? You’re not alone! Here are answers to the most common queries to help you design a thriving, low-maintenance oasis for pollinators.
What’s the best type of water trough for a flower bed?
A shallow, wide trough (like a plastic livestock trough or galvanized steel stock tank) works best. Look for one with a gentle slope to prevent water pooling, and ensure it’s food-safe (no toxic coatings). Avoid deep troughs—shallow is key for easy planting and drainage!
When is the best time to plant flowers in a water trough?
Spring or early fall are ideal! Plant after the last frost (check your USDA hardiness zone) to give roots time to establish before extreme heat. For year-round blooms, stagger plantings—cool-season flowers (like pansies) in fall, warm-season (like sunflowers) in spring.
How often should I water a water trough flower bed?
Water daily in hot weather (morning is best) to keep the soil moist but not soggy. In cooler months, every 2–3 days may suffice. A drip irrigation system or sprayer attachment on your hose makes this easy. Pro tip: Fill the trough halfway with water to mimic a natural wetland—pollinators love it!
Can I use a water trough for vegetables instead of flowers?
Troughs work great for herbs, lettuce, or shallow-rooted veggies like radishes. Just ensure the soil is nutrient-rich (add compost) and the trough has drainage holes. Avoid heavy feeders like tomatoes—they need deeper roots. Bonus: The same watering rules apply!
Why aren’t pollinators visiting my trough?
Check these fixes:
- Add native flowers: Pollinators prefer local, nectar-rich plants like coneflowers or milkweed.
- Include water sources: Add a small fountain or floating plants for bees to drink.
- Avoid pesticides: Even "natural" sprays can harm pollinators.
- Provide perches: Flat rocks or branches let bees rest.
If the issue persists, try moving the trough to a sunny, sheltered spot—pollinators love warmth but hate wind!
Wrapping up and next steps
Creating a water trough flower bed is a simple yet impactful way to support pollinators while adding beauty to your space. With minimal effort, you’ve designed a thriving ecosystem that attracts bees, butterflies, and birds—all while keeping maintenance to a breeze. 🌸
Ready to take the next step? Start small—even a single repurposed trough can make a difference! Share your progress with fellow gardeners or expand your setup with more native plants. Every little oasis helps our buzzing friends thrive. Happy planting! 🌿