Flowers
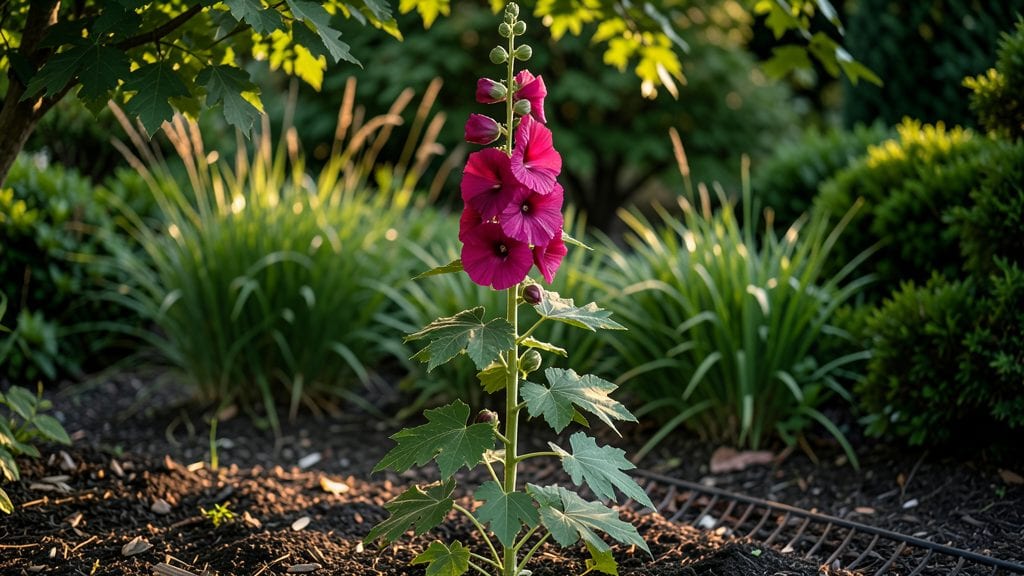
Hollyhock perennial flowers bring towering drama and a magnet for bees to any garden. 🌿 I remember the first time I planted them—the way they shot up like ancient castles, their spiky blooms swaying in the breeze.
These biennials or short-lived perennials aren’t just pretty; they’re the backbone of a pollinator-friendly garden.
They thrive in full sun to partial shade and prefer well-draining soil, though they’ll tolerate average garden conditions once established. The real secret? Plant them where they won’t get crowded—they need space to grow 4-6 feet tall without flopping.
Water consistently during their first year, but once mature, they’re surprisingly drought-tolerant.
By late spring or early summer, you’ll be rewarded with clusters of vibrant blooms in pink, purple, or white that last for weeks. The vertical height makes them perfect for cutting or adding structure to borders.
Just watch for Japanese beetles—they love hollyhocks, but a quick spray of neem oil keeps them in check.
With minimal care, these old-fashioned beauties will return year after year, drawing hummingbirds and butterflies while adding old-world charm to your garden. The best part? They self-seed reliably, so you’ll have new plants popping up for seasons to come.
📚 In This Guide
- What you need
- Instructions
- Tips and common mistakes
- Wrapping up and next steps
What you need
- ● Hollyhock seeds or nursery-grown plants: Seeds: 10–20 seeds (choose heirloom varieties like 'Black Prince' or 'Peach Blow' for vibrant colors).
- ● Plants: 3–5 mature plants (transplants ensure faster blooms).
- ● Well-draining soil: Mix 1 part garden soil with 1 part compost (hollyhocks love nutrient-rich, slightly alkaline soil, pH 6.5–7.5).
- ● Sunlight: A spot with full sun (6+ hours/day)—they thrive in open, airy locations.
- ● Water: Consistent moisture (1–2 inches per week; mulch helps retain it).
- ● Garden trowel or shovel (for planting seeds/transplants).
- ● Garden fork (to loosen soil before planting).
- ● Pruners or shears (for deadheading and shaping).
- ● Watering can or hose with a gentle spray nozzle (avoid blasting seeds!).
- ○ Mulch (optional but recommended): Straw or shredded bark (2–3 inches) to suppress weeds and retain moisture.
- ○ Stakes or trellis (optional): Tall varieties (like 'Russia Giant') may need support—use 4–6 ft stakes.
- ● 🌡️ Timing: Sow seeds in early spring (after last frost) or late summer for fall blooms.
- ● ✨ Soil prep: Hollyhocks hate soggy roots—amend clay soil with sand or perlite.
- ● 🎯 Pest watch: Keep an eye out for Japanese beetles or rust fungus (remove affected leaves promptly).
Step-by-step guide to planting and caring for hollyhock perennial flowers
Here's how to grow these towering beauties that bring pollinators and vertical drama to your garden.
🌱 Step 1: Choose the Perfect Planting Location
Hollyhocks thrive in full sun to partial shade, needing at least 6 hours of sunlight daily for their signature height and bloom production. I always pick a spot with well-draining soil—these plants hate soggy roots. If your soil is heavy clay, mix in 2-3 inches of compost before planting to improve drainage.
Here's the thing—hollyhocks grow 5-8 feet tall, so place them where they won't block sunlight to shorter plants. I like positioning them along fences or at the back of borders. The reason we give them space is that their large leaves need room to spread without competing for light.
🪴 Step 2: Plant Bare-Root Hollyhocks at the Right Time
Plant bare-root hollyhocks in early spring (after the last frost) or fall, when the soil is cool but workable. Dig a hole twice as wide as the root ball but only as deep as the roots themselves—burying too deep encourages rot. Gently spread the roots outward in the hole before backfilling with soil.
Water deeply right after planting to settle the soil and remove air pockets. You'll know you've done it right when the soil surface looks slightly firm but not compacted. I always add a 2-inch layer of mulch around the base (keeping it 6 inches from the stem) to retain moisture and suppress weeds.
☀️ Step 3: Provide Consistent Water and Support
Keep the soil evenly moist but not soggy during the first growing season—hollyhocks establish deep roots, so 1 inch of water per week is ideal. You'll see new leaves emerge within 2-3 weeks if moisture is right. Once established, they're quite drought-tolerant, but flowers will be fewer if soil dries out completely.
Here's where it gets fun—install sturdy garden stakes or a trellis at planting time. Hollyhocks grow top-heavy and often need support, especially in windy areas. I use 3-4 foot bamboo stakes driven 6 inches deep beside each plant, tying stems loosely with soft twine as they grow. This prevents stem breakage and keeps flowers upright for pollinators.
✂️ Step 4: Prune and Deadhead for Better Blooms
Remove spent flowers regularly by cutting the stem back to the nearest leaf or bud. This encourages continuous blooming throughout the summer. I always use clean, sharp shears and make cuts at a 45-degree angle just above a leaf node to prevent water from pooling on the stem.
In late fall, cut back dead stems to 6 inches above the ground. This tidies up the plant and prevents disease buildup in old growth. Real talk: Hollyhocks can be prone to rust fungus, so avoid overhead watering and remove any yellowing leaves promptly. Healthy plants will send up new growth in spring.
🌿 Step 5: Divide and Renew Every 3-4 Years
Hollyhocks often decline after 3-4 years due to overcrowded roots. In early spring, dig up the clump and separate into smaller sections, ensuring each has 3-5 healthy stems. Replant immediately in fresh soil, watering well afterward. This rejuvenation step is crucial—it's how you keep your hollyhocks thriving for decades.
Here's the moment that matters: After dividing, watch for new shoots emerging within 2-3 weeks. This signals the plant is recovering well. I always mark the new planting spots with small stakes so I don't accidentally disturb them while weeding. With proper care, your hollyhocks will reward you with towering, pollinator-friendly blooms year after year.
Tips & tricks for perfect hollyhock perennial flowers
These simple strategies will help your hollyhocks reach their full dramatic potential while keeping them healthy for years to come.
Sunlight Strategy: While hollyhocks need at least 6 hours of sunlight daily, the magic happens in the morning. Position them to receive direct sunlight from 8 AM to noon—this gives them the energy boost they need for those towering stems. In partial shade spots, supplement with a small grow light for 2-3 hours in the morning if you notice leggy growth.
Planting Depth Secret: When planting bare-root hollyhocks, don't bury them too deep—this is where most beginners go wrong. The top of the root ball should sit just below soil level, with the soil line visible. I've seen many gardeners bury them too deep, which causes rot and stunted growth. Think of it like planting potatoes—they need room to breathe at the top.
Watering Wisdom: The 1 inch of water per week guideline works perfectly in most climates, but timing matters just as much. Water in the early morning so the leaves have all day to dry, preventing fungal diseases. I've learned this the hard way after losing plants to rust fungus—wet foliage overnight is an open invitation to trouble. Use a rain gauge or tuna can to measure exactly 1 inch of water each week.
Support System: Install your 3-4 foot bamboo stakes at planting time, not when the plants are already toppling over. Drive them 6 inches deep for stability, and tie stems loosely with soft twine every 12-18 inches as they grow. I use old t-shirts cut into strips—they're gentle on stems and won't cut into the plant as it grows. This prevents the dramatic flopping that gives hollyhocks their bad reputation.
Pro Tips for Hollyhock Perennial Flowers
- These simple strategies will help your hollyhocks reach their full dramatic potential while keeping them healthy for years to come.
- Sunlight Strategy: While hollyhocks need at least 6 hours of sunlight daily, the magic happens in the morning.
- Planting Depth Secret: When planting bare-root hollyhocks, don't bury them too deep—this is where most beginners go wrong.
Frequently asked questions
Got questions about growing and caring for hollyhock perennial flowers? You’re not alone! Here are answers to the most common queries—from planting tips to troubleshooting—so you can enjoy these towering beauties with confidence.
Are hollyhocks truly perennial, or do they come back every year?
Most hollyhocks (Alcea rosea) are short-lived perennials, typically lasting 2–3 years before needing replacement. However, some varieties (like Alcea ficifolia) are true perennials and may return for 5+ years in mild climates. Deadhead spent blooms to encourage reblooming, and mulch roots in winter to extend their lifespan!
When is the best time to plant hollyhock seeds or transplants?
For seeds, sow directly in early spring (after the last frost) or late summer (6–8 weeks before your first frost). Transplants thrive when planted in spring or early fall, giving roots time to establish before extreme heat or cold. Avoid transplanting during peak summer—hollyhocks hate soggy soil!
Do hollyhocks attract pollinators, and how can I boost their benefits?
Hollyhocks are a pollinator magnet, drawing bees, butterflies, and hummingbirds. To maximize their impact, plant in clusters near other nectar-rich flowers (like lavender or coneflowers). Avoid pesticides, and leave some blooms to seed—birds love the seed pods! Pro tip: Deadhead faded flowers to redirect energy to new blooms and keep pollinators coming back.
Why are my hollyhock leaves turning yellow or spotted?
Yellow leaves often signal overwatering or fungal issues like rust or powdery mildew (common in humid climates). Spotted leaves? Likely rust (Puccinia), a fungal disease. Fix it: Space plants for airflow, water at the base (not overhead), and remove infected foliage immediately. For prevention, rotate crops annually—don’t replant hollyhocks in the same spot yearly.
What are some low-maintenance alternatives to hollyhocks?
If hollyhocks seem high-maintenance, try these dramatic, pollinator-friendly perennials:
- Delphiniums: Tall, spiky blooms (but even more prone to mildew—stake them!)
- Foxgloves (Digitalis): Biennial with unique, bell-shaped flowers (self-seeds easily).
- Russian Sage (Perovskia): Drought-tolerant, long-blooming, and deer-resistant.
- Coneflowers (Echinacea): Tough, long-lasting, and super pollinator-friendly.
Wrapping up and next steps
Hollyhock perennial flowers bring bold beauty and eco-friendly charm to any garden with their towering stature and pollinator-friendly appeal.
Whether you're drawn to their vibrant colors, low-maintenance care, or their role in supporting bees and butterflies, these flowers are a fantastic addition for both beginners and seasoned gardeners. 🌸
Ready to transform your outdoor space? Start by selecting the perfect variety, prepping your soil, and planting with confidence—your future blooms will thank you! Grab your gloves and get growing!