
Flowers
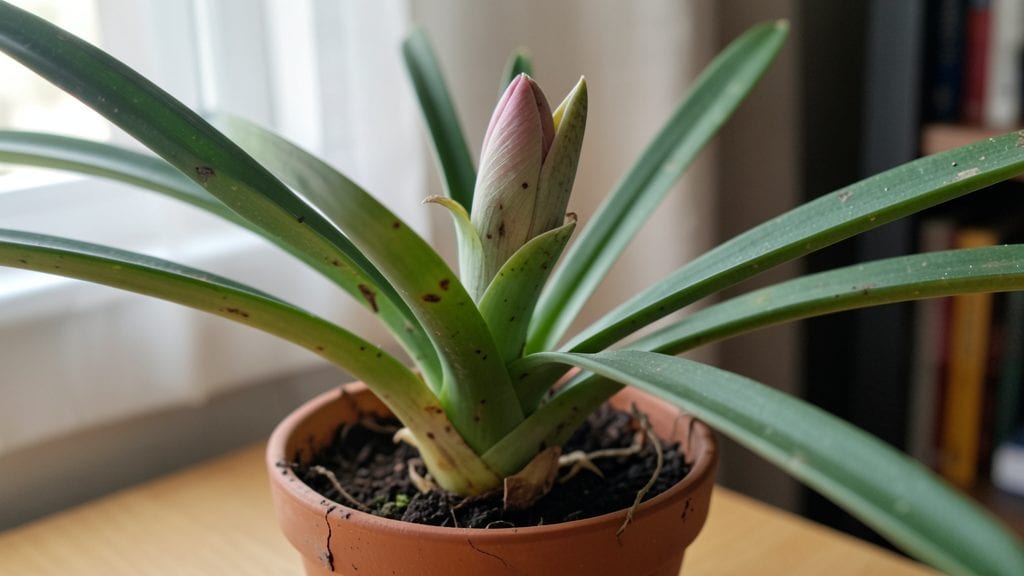
The moment your amaryllis flower bud appears is the most exciting part of forcing these bulbs to bloom indoors this holiday. 🌟 I remember the first time mine shot up like a green rocket—from a dormant bulb to a towering stalk in just weeks.
That’s the magic of amaryllis, and it all starts with giving those buds exactly what they need.
Light, temperature, and watering work together like a secret handshake to coax those buds into opening. Too little light and they’ll stretch weakly; too much heat and they’ll wilt before blooming. My trick?
Place them in bright, indirect light near a south-facing window and keep the room between 65-75°F—that’s the sweet spot for bud development. Water just enough to keep the soil lightly moist, but never soggy.
You’ll know you’re doing it right when the buds firm up and turn a rich, velvety green. Healthy buds should feel plump and tight, like little green marbles. If they look shriveled or dry, it’s time to adjust your care—usually, that means more humidity or better light.
Within 6-8 weeks, those buds will unfurl into showstopping blooms that last for weeks.
Even if your first attempt isn’t perfect, amaryllis are forgiving. The key is patience and consistency—these bulbs reward you for paying attention. Once you master the bud stage, you’ll have a foolproof system for holiday blooms every year. Let’s get those stalks growing!
📚 In This Guide
- What you need
- Instructions
- Tips and common mistakes
- Wrapping up and next steps
What you need
- ● 1 healthy amaryllis bulb (look for bulbs with a firm, papery skin and no soft spots)
- ● 1 small to medium-sized pot (6–8 inches in diameter with drainage holes)
- ● Pebbles or gravel (about 1–2 inches deep for drainage)
- ● Well-draining potting mix (cactus or succulent soil works best—avoid heavy garden soil!)
- ● Distilled or room-temperature water (1–2 cups, as needed)
- ○ Optional: Sphagnum moss or coconut coir (for moisture retention around the bulb)
- ● Gloves (to protect your hands from sharp bulb edges)
- ● Trowel or spoon (for planting and layering pebbles)
- ● Spray bottle (for gentle watering—avoid soaking the bulb!)
- ● Bright, indirect light source (east or west-facing window, or a grow light)
- ○ Thermometer (optional) (to monitor temps between 65–75°F for optimal growth)
- ● Fertilizer (balanced, 10-10-10 or bulb-specific) (diluted to half-strength after buds form)
Step-by-Step instructions for forcing amaryllis bulbs to bloom indoors
Here's how to coax those stunning blooms right when you need them most.
🌱 Step 1: Select and Prepare Your Bulb
Choose a healthy amaryllis bulb that's at least 4-5 inches wide—bigger bulbs produce more stems and blooms. Look for firm, dry skin with no soft spots or mold. I like to soak the bulb in lukewarm water for 10-15 minutes before planting to wake it up gently. This helps break any dormancy and encourages faster root growth.
Here's the thing—don't skip the soak. Bulbs often arrive dehydrated from storage, and this step jumpstarts their metabolism. You'll see roots emerge within 3-5 days if everything's right. If your bulb feels light for its size, it might need a longer soak or even an overnight rest in water.
🪴 Step 2: Plant and Position for Root Growth
Fill a 6-8 inch deep container with well-draining potting mix—amaryllis bulbs rot easily if they sit in soggy soil. I use a mix of 50% peat moss and 50% perlite for perfect drainage. Place the bulb in the center, with about half of it above the soil line. This exposed portion helps prevent rot while still allowing roots to develop.
Water lightly after planting, just enough to moisten the soil around the base. Now comes the waiting game: position your pot in bright, indirect light (no direct sun yet) and keep the soil evenly moist but not soggy. You'll know you're on track when you see green roots pushing through the drainage holes in 7-10 days. This is your signal that the bulb is actively growing.
☀️ Step 3: Trigger Flowering with Light and Temperature
Once roots are 2-3 inches long, move your amaryllis to a spot with bright, indirect sunlight for 12-14 hours daily. A south-facing window works well, but avoid harsh afternoon sun that can scorch the leaves. Here's where it gets fun—this is when you'll start seeing the flower stalk emerge from the center of the bulb.
Keep the soil consistently moist during this phase, but don't let it get waterlogged. The key is maintaining 65-75°F daytime temperatures. If your home runs cooler, consider placing a small heating pad under the pot (set to low) to encourage faster stalk growth. You'll typically see the first signs of a bud in 6-8 weeks after planting.
💧 Step 4: Care for the Blooming Stage
When your amaryllis flower stalk reaches 6-10 inches tall, you're just weeks away from blooms. This is when you'll need to be extra attentive. Water when the top inch of soil feels dry, but never let water pool in the center of the bulb. I like to use the "finger test"—stick your finger in the soil to check moisture levels before watering.
Here's the moment that matters: once buds appear, move the plant to a cooler spot (around 55-65°F at night) to prolong bloom time. The cooler temperatures help the flowers last 1-2 weeks longer instead of just a few days. Watch for buds to open fully—you'll know they're ready when the petals start to unfurl completely. Real talk: this is when your holiday decor gets a serious upgrade!
⏰ Step 5: Post-Bloom Care and Next Steps
After the flowers fade, don't cut the stalk—let it die back naturally. This helps the bulb store energy for next year. Reduce watering gradually over 4-6 weeks until the leaves turn yellow and wither. At this point, you can remove the old foliage and store the bulb in a cool, dry place (around 50-60°F) until next holiday season.
I know it seems counterintuitive to stop watering when the plant looks dead, but this resting period is crucial. A well-rested bulb will often produce even more dramatic blooms the following year. Mark your calendar—replant in late summer or early fall to give it time to root before winter.
Tips & tricks for perfect amaryllis blooms this holiday
Here's what nobody tells you about getting those showstopping blooms right when you need them most.
Bulb Selection Tip: When choosing your amaryllis bulb, look for one with a firm, heavy feel—it should feel solid like a small melon. Bulbs that feel light for their size are often dehydrated from storage and may need the longer overnight soak (not the standard 10-15 minutes) to fully rehydrate. I've found that bulbs with a slightly rough texture tend to produce more stems than those with smooth, waxy skin. This is especially important for holiday displays where multiple stems create a dramatic impact.
Root Growth Visual Cue: In Step 2, when you're waiting for those 7-10 days until roots emerge, place your pot on a saucer or tray. The roots will push through the drainage holes first, and you'll see them clearly against the light-colored surface. This visual confirmation means your bulb is actively growing and ready for the next phase. If you don't see roots by day 10, check your soil moisture—it might need a slightly longer recovery period from planting.
Light Transition Strategy: The move from indirect to bright light in Step 3 can be tricky. Start by placing your amaryllis in a spot that gets morning sun and afternoon shade, then gradually increase the direct light exposure over 3-4 days. This slow transition prevents leaf scorch while still providing the 12-14 hours of light needed to trigger flowering. I've had bulbs develop sunburn spots when moved too quickly to full sun—watch for pale or crispy leaf edges as a warning sign.
Temperature Hack: If your home consistently runs cooler than the ideal 65-75°F range, try placing the pot on a low-heat heating pad (set to low) for 4-6 hours daily during the root growth phase. This gentle warmth mimics the bulb's natural tropical environment and can help compensate for cooler indoor temperatures. Just be careful not to overheat—you want to maintain that 65-75°F range, not exceed it.
Pro Tips for Amaryllis Flower Bud
- Here's what nobody tells you about getting those showstopping blooms right when you need them most.
- Bulb Selection Tip: When choosing your amaryllis bulb, look for one with a firm, heavy feel—it should feel solid like a small melon.
- Root Growth Visual Cue: In Step 2, when you're waiting for those 7-10 days until roots emerge, place your pot on a saucer or tray.
Frequently asked questions
How long does it take for an amaryllis flower bud to bloom after forcing?
Once you place your amaryllis bulb in water or soil and keep it in a warm, dark spot, you’ll typically see flower buds emerge in 6–10 weeks. The actual blooms last about 7–10 days, but the foliage will continue growing for months afterward. Patience is key—don’t rush the process!
Can I force an amaryllis bulb to bloom faster?
Unfortunately, you can’t speed up blooming significantly, but you can optimize conditions! Keep the bulb in a warm (70–75°F) dark spot (like a closet) for the first 6–8 weeks. Once buds appear, move it to bright, indirect light (no direct sun yet). Avoid cold drafts or temperature swings—they slow growth.
What should I do if my amaryllis flower bud turns brown or mushy?
Brown or mushy buds usually signal overwatering or rot. If the bulb is still firm, trim the damaged bud and reduce watering. Let the soil dry slightly between waterings. If the bulb smells foul or feels soft, it may be too late—discard it. For water-forced bulbs, ensure only the base sits in water (not submerged).
Do I need to remove the flower bud after blooming?
Yes! Once the blooms fade, snip the stem just above the bulb to redirect energy to the leaves. This helps the bulb store nutrients for next year’s growth. The foliage will yellow and die back naturally—don’t worry! You can cut it back when it’s fully browned (about 6–8 weeks after blooming).
What if my amaryllis doesn’t produce a flower bud?
No buds? Check these common culprits:
- Light: Move it to bright, indirect light (east/west window) once buds form.
- Temperature: Keep it above 60°F—cold slows growth.
- Age: Bulbs under 3 years old may need a rest period (6 weeks of darkness) first.
- Health: Yellow leaves or weak stems? It may need fertilizer (balanced 10-10-10) or less water.
Wrapping up and next steps
Watching an amaryllis flower bud bloom indoors is a rewarding experience that brings holiday cheer and natural beauty to your space! With the right care—like proper lighting, watering, and patience—you can coax stunning blooms from your bulbs year after year. 🌸
Ready to turn your green thumb into a floral artist? Start by gathering your supplies, follow the forcing steps, and soon you’ll be admiring those showstopping blooms. Next up: Share your progress with fellow plant lovers or experiment with different varieties to keep the magic growing!